Design A Blogger Theme - Tutorial
Creating a blogger theme is not difficult as you might think. I searched on Google, read some documentations and tutorials, and I created a Blogger theme. So you can create your own Blogger theme too. You need to know how Blogger theme works? and How blog theme shows up?
Is this tutorial for you? 🔗
You must know fundamentals of HTML, CSS, Javascript and XML to understand this tutorial easily. So you can create your own customized blogger theme after this well-documented tutorial.
How Blogger works? 🔗
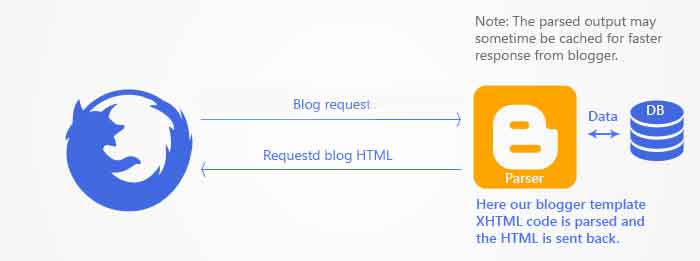
The internet browser sends an HTTP request, then Blogger parse the XHTML code of the theme and contact database if needed, then send back the rendered HTML webpage to the user’s internet browser.
The Basic layout of Blogger Theme 🔗
<?xml version="1.0" encoding="UTF-8" ?>
<!DOCTYPE html PUBLIC "-//W3C//DTD XHTML 1.0 Strict//EN" "http://www.w3.org/TR/xhtml1/DTD/xhtml1-strict.dtd">
<html xmlns='http://www.w3.org/1999/xhtml' xmlns:b='http://www.google.com/2005/gml/b' xmlns:data='http://www.google.com/2005/gml/data' xmlns:expr='http://www.google.com/2005/gml/expr'>
<head>
<title><data:blog.pageTitle/></title>
</head>
<body>
<!-- BODY CONTENTS -->
</body>
</html>
Blogger Theme is also known as Blogger Template. Blogger theme contains XHTML code and Blogger Elements.
In the above code sample, there are some xmlns definitions. xmlns stands for XML NameSpace. Those namespaces are the Blogger handlers for other hidden parts of Blogger such as database.
What is the meaning of xmlns definitions? 🔗
xmlns:bprovide the use of the Blogger Elements.xmlns:datacontact us with the Blogger database.xmlns:exprcalculates the attributes in Blogger. This make themes more flexible and dynamic.
Notice: You can replace xmlns:b with xmlns:blog and xmlns:data with xmlns:d if you want, but I prefer the default implementation of the Blogger theme.
Before writing the Blogger theme 🔗
Take your time in design. Draw the theme you image on paper, or use Photoshop, Illustrator, GIMP, Adobe XD or Figma. Add the theme menu, logo, theme columns, the design of footer, .. and so on.
Blogger Section 🔗
Blogger theme is consists of sections. The page parts are sections. The use of sections in Blogger is similar to its use in modern HTML5.
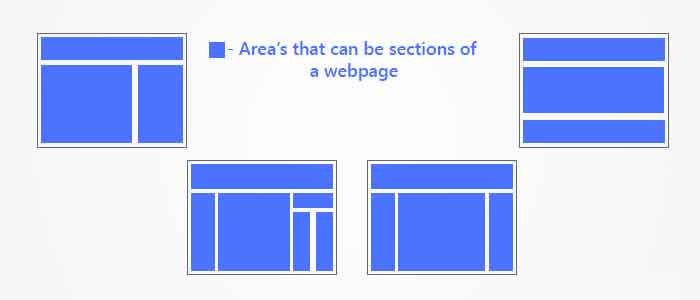
In the above image, you see the parts of the layout. Each one of those parts is a section in Blogger theme.
How to write section element in Blogger? 🔗
This is the section code in Blogger.
<b:section id='' class='' maxwidgets='' showaddelement=''>
</b:section>
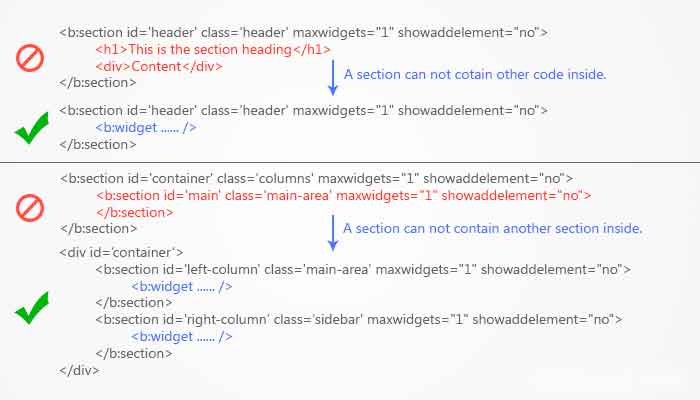
You can write HTML code above or below the section element, but you can’t write HTML code inside section element/tag. Write widget element inside the section element. So we use <widget> to add content to <section> as you’ll see shortly.
Attributes of section element in Blogger 🔗
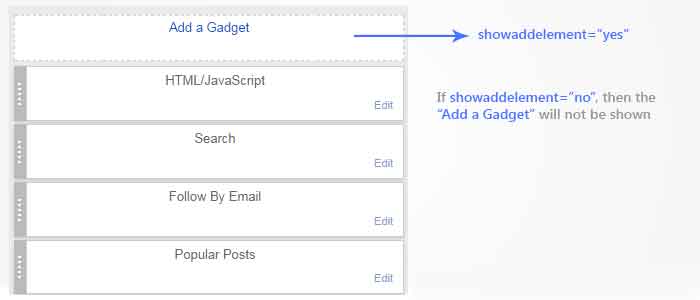
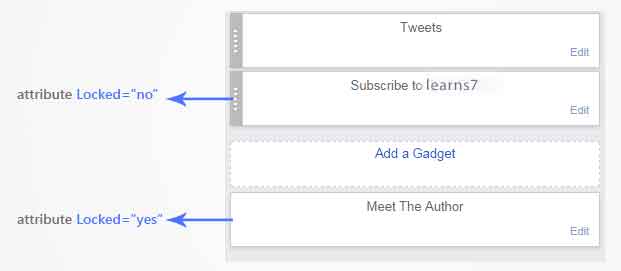
id(required) : unique name, can’t be resued in the same Blogger theme. It contains only English letters and numbers.class(optional) : the common names are navbar, header, main, sidebar and footer. Using those names makes changing themes easier, but you can use other names as you like.maxwidgets(optional) : defines the maximum number of widgets allowed in this section. if you did not define it, the number of widgets in the section will be unlimited.showaddelement(optional) : it saysyesorno. The default value isyes. It determines if the “add widget” button shows up in the section in the layout editor of Blogger or not.
growth(optional) : it must be horizontal or vertical, and the default value is vertical. It determines if the widgets inside the section will be side-by-side, or stacked below each other.
Section in Blogger contains widgets only. It can not contain any other HTML tags / elements.
Example of using Section in Blogger 🔗
<b:section id='header' class='header' maxwidgets="1" showaddelement="no">
<!-- Section contents -->
</b:section>
<b:section id='main' class='main' maxwidgets="1" showaddelement="no">
<!-- Section contents -->
</b:section>
<b:section id='footer' class='footer' showaddelement="no">
<!-- Section contents -->
</b:section>
notice: Blogger theme must contain at least two sections or else an error message will show up after you click save / update.
Blogger Widget 🔗
Sections contains only widgets. Sections are Blogger elements to make the layout of the blog. Widget contains the data we want to show on the blog.
The simplest widget is a one-liner determines the place of the data shows in the blog. There are some default widgets in Blogger, but you can create custom widgets too.
Widget information is stored in Blogger database. It is executed / rendered when showing the widget only.
How to use widget in Blogger 🔗
<b:widget id='' locked='' mobile='' title='' pageType='' type='' />
id(required) : It contains only English letters and numbers. Theidmust be unique. You can not change the widget or create a new one dynamically.type(required) : it determines the widget type as one of the following types:- BlogArchive
- Blog
- Feed
- Header
- HTML
- SingleImage
- LinkList
- List
- Logo
- BlogProfile
- NavBar
- VideoBar
- NewsBar
locked(optional) : it can beyesornoand the default value isno. Locked widget can not be removed from the layout.
title(optional) : The widget title. If you did not define it, a default value will be used; for example List1.pageType(optional) : its value isall,archive,mainoritem. The default value isall. Widgets will be shown in the pages as you chose in your theme. But all widgets will be shown in the Blogger layout editor.mobile(optional) : it isyes,nooronly. The default value isdefault. This value determines if this widget shows up on mobile or not. By default, Header and Blog and Profile and PageList and AdSense will be shown on mobile.
widget code sample in Blogger 🔗
<b:section id="sidebar" class="sidebar" maxwidgets="" showaddelement="yes">
<b:widget id='CustomSearch1' title='Search' type='CustomSearch' locked='false'/>
<b:widget id='FollowByEmail1' title='Follow By Email' type='FollowByEmail' locked='false' />
<b:widget id='PopularPosts1' locked='false' title='Popular On Relatemein' type='PopularPosts'/>
<b:widget id='Label1' type='Label' locked='false' />
</b:section>
We know sections, widgets and built-in widgets. But now we will know how to create and use custom widgets in Blogger themes.
Basic <b:widget/> implementation 🔗
<b:widget [attributes...] />
Consider the widget as a function call. And the function is predefined in the Blogger backend / hidden layers.
create custom widget 🔗
To create custom widget, edit the widget code as follows.
<b:widget [attributes...] >
</b:widget>
All widgets we talked about so far, are predefined widgets by Blogger. But now we’ll use the type HTML as you see in this code snippet.
<b:widget id='HTML1' type='HTML'>
</b:widget>
It is prefered to set the widget id as the widget type and some number. For example, HTML1 and HTML2.
<b:widget id='HTML1' type='HTML' locked='yes' title='Contact Us'>[Widget code here...]</b:widget>
<b:widget id='HTML2' type='HTML' locked='yes' title='Labels'>[Widget code here...]</b:widget>
Using Include and Includable in Blogger 🔗
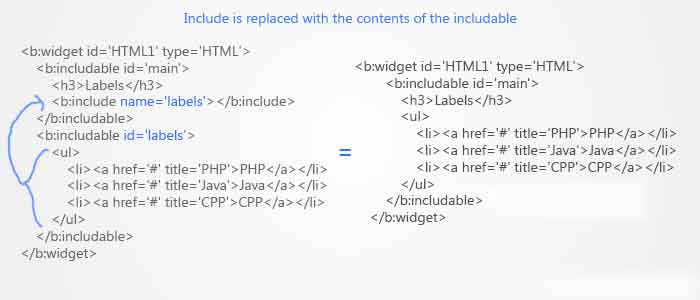
Widget contains only includable. But includable can include those two:
include: it equals a function call in programming languages. It include an includable to execute its code.includable: It equals a function definition, the body of the function. It is the code to be executed to render some data.
This image illustrates include and includable more.
use includable in Blogger theme 🔗
The syntax of includable
<b:includable id='uniqueId' var='dataForWidget'>
    [Here we can place any piece of code]
</b:includable>
What are the Includable Attributes 🔗
id(required) : unique identifier, contains English letters and numbers only.var(optional) : it is a variable, contains English letters and numbers. It is used as a reference for data. We use it to pass data from widget to another widget.
What is Include 🔗
We use include when we want to reuse the same code snippet in more than one place. In this case we add the code snippet in an includable then we call it using include as you see in the following code.
<b:includable id='main'>
    <b:loop var='i' values='posts'>
    <b:include name='post' data='i'/>
    </b:loop>
</b:includable>

<b:includable id='post' var='p'>
    Title: <data:p.title/>
</b:includable>
The include syntax 🔗
<b:include name='idOfTheIncludable' data='dataForIncludable' />
include Attributes 🔗
name(required) : it is an identifier which contains English letters an numbers only. It must equal anidof ab:includable.data(optional) : it is a concept or information which is the value ofvarofincludable.
Default Includable 🔗
All custom widgets must have an includable with id equals main. This includable contains all the content of the widget. This is the only includable which you must use.
But if you want to use more includables inside the main includable or outside it, you can. Just call that includable inside the main includable using the include.
Even if you have too many includables inside a widget, the main includable is the one which will be shown. So you should include other includables inside the main includable to be shown on your blog.
If you know C programming language, you know the main() function which is the entry point of the program. Consider the main includable as the main function of the widget.
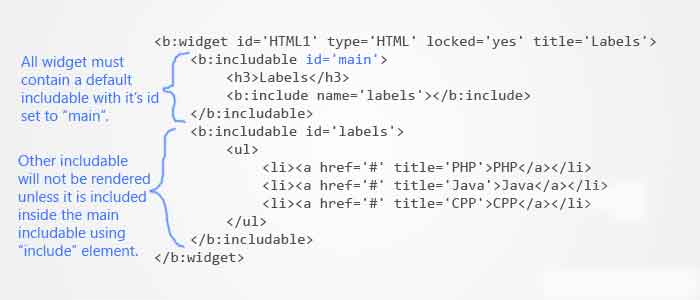
complete example of widget in blogger themes 🔗
<b:widget id='HTML1' type='HTML' locked='yes' title='Labels'>
    <b:includable id='main'>
        <h3>Labels</h3>
        <b:include name='labels'></b:include>
    </b:includable>
    <b:includable id='labels'>
        <ul>
            <li><a href='#' title='PHP'>PHP</a></li>
            <li><a href='#' title='Java'>Java</a></li>
            <li><a href='#' title='CPP'>CPP</a></li>
        </ul>
    </b:includable>
</b:widget>
We finished the widget, includable and include. Now we go deeper in coding Blogger theme. Let’s know data tag, looping and conditional tags.
conditional in blogger theme 🔗
As you know, there is a conditional statement with if/else in programming languages. In conditionals, the information or code will be executed if the condition is met. This is the way to write conditionals in Blogger theme.
<b:if cond='condition'>
    [content to display if condition is true]
<b:else/>
    [content to display if condition is false]
</b:if>
The b:else part is optional. So you can write an b:if statement without the else part. If the condition is met, the code inside the b:if tag will be executed.
The condition must be true or false (boolean type). You can use data namespace if its result is true or false. For example data:post.allowComments which returns true if writing comment is allowed, and false if writing comment is forbidden.
More Examples 🔗
<b:if cond='data:post.numComments > 1'>: returns true if the blog post has more than one comment.<b:if cond='data:blog.pageType == "item"'>: return true if the blog post is an item page. The item page in Blogger is the web page which will show the whole blog post.
Or you can compare two values, and execute some code if the comparison returns true. Read this code example.
<b:if cond='data:post.numComments > 1'>
    [Comments are available]
<b:else/>
    [Comments are not available]
</b:if>
loop in blogger theme code 🔗
b:loop tag let you re-execute the same code again and again as you like. Looping over data is important especially when you try to show a list of information such as labels (aka. categories). And looping is important to show the comments below each blog post, and it is beneficial in showing a list of blog posts.
how to write loop in blogger theme 🔗
<b:loop var='identifier' values='set-of-data'>
    [content that will be repeated]
</b:loop>
The attribute values must contain a list of data. And every item in that list is considered as a var inside the loop. So you can use each item inside the loop as you like.
Data Tag 🔗
:data tag is one of the most important tags / elements on the Blogger platform. This is the namespace where we can get the blog info such as blog title, URL and posts.
Example for data tag in Blogger theme 🔗
<b:widget id='PopularPosts1' locked='false' title='Popular Posts' type='PopularPosts'>
    <data:title/>
</b:widget>
data tag contains different information in different areas of code (context). If you use it inside a widget, the information from data will be about the current widget. And this data changes according to the widget type. You can think of it as a scoped variable.
If you used data outside the widget, it is considered global scope, so you will get the blog information (not the widget information).
examples of using data variable in different scopes 🔗
<b:widget id='FollowByEmail1' title='Follow By Email' type='FollowByEmail' locked='false'>
    <b:includable id='main'>
        <h3><data:title/></h3>
    </b:includable>
</b:widget>
<b:widget id='PopularPosts1' locked='false' title='Popular Posts' type='PopularPosts'>
    <b:includable id='main'>
        <h3><data:title/></h3>
    </b:includable>
</b:widget>
In code, I used <data:title/> in both widgets, but the title will be different in each widget.
We can get the blog information using blog which is available in all parts of the code. Using blog variable is similar to the way we deal with Javascript object.
blog is similar to object in Javascript. It has attributes we can get those information using dot notation like Javascript.
Javascript code 🔗
// Consider the following scenario in JavaScript
// Consider blog is a property of "window" and window is identical to data.
blog = {
    'title': 'The title for the blog',
    'pageType': 'The type of the current page. One of "item", "index", "archive"',
    'homepageUrl': 'The homepage of the blog',
    'pageName': 'The title of the current page'
};

alert(blog.title);

if (blog.pageType == 'item') {
    alert(blog.pageName);
} else {
    alert(blog.title);
}
We can write the same code in Blogger as follows.
<b:if cond='data:blog.pageType != "item"'>
    <data:blog.title/>
<b:else/>
    <data:blog.pageName/>
</b:if>
In Blogger, blog has all information about the blog itself.
expr in Blogger 🔗
expr is used to calculate a value, and give it to the attribute. It is usually used to calculate attribute value from :data in Blogger themes.
expr code sample 🔗
<tagName expr:attribute='expression'></tagName>
example of using expr in blogger theme code 🔗
<b:includable id="nextPrevLink">
    <div style="display: inline">
        <strong>
        <a expr:href="data:olderPageUrl" expr:title="data:olderPageTitle">Older Posts</a>
    </strong>
        <strong>
        <a expr:href="data:newerPageUrl" expr:title="data:newerPageTitle">New Posts</a>
    </strong>
    </div>
</b:includable>
In the previous code, I used expr to give the value of href and the value of title which we pulled from data. We can use the same way to calculate condition (in conditionals) to give values to attributes according to a condition.
So far, We talked about conditions, and loops in Blogger themes.
Designing a Blogger theme is easy like creating HTML web pages but Blogger give us a way to make the pages dynamic. Blogger engine parses the code / theme then compose / render pages from one page.
We knew all about Blogger elements and the way we use them. Now we’ll start our journey to the cascading style sheets (CSS) and design styles. How to add CSS styles? How to use CSS variables? defining variable. Page layout. How to make your theme a Theme designer ready?.
Theme Designer (aka. Template Designer) is a way you can change settings and styles of the current blogger theme your blog uses.
using b:skin to style your blog theme 🔗
b:skin Blogger element is used like <style> element in HTML web pages. You add CSS styles inside it to beautify the design of the layout. You can create variables inside b:skin and use them as values of the CSS style attributes / properties. You can group related variables in a group in CSS style inside b:skin.
adding b:skin 🔗
<b:skin> must be added inside <head> in the Blogger theme. The style variable must be written inside /* **/ or <![CDATA[ ]]> to make sure that the Blogger engine behaves the way it should.
How to add CSS styles in Blogger theme? 🔗
<!-- Defining b:skin example -->
.....
<head>
    .....
    <b:skin><style type="text/css">
        /**
        *  Variable Definitions go here.
        */

        /**
        *  CSS Styles go below, followed by the Variable Definitions
        */
    <style></b:skin>
    ......
</head>
.....
Using style varibles in CSS in Blogger theme 🔗
Use <Variable> tag with some of those attributes:
name: unique name, unrepeated, contains English letters and numbers only.description: short definition of the variable. This description is shown in template designer (theme designer) when you want to customize the theme.type: its value isfont,color,length,string,urlorbackground. Some of these values add more attributes for the variable.value: the value of the variable.default: the default value of the variable. Blogger engine uses this value in case thevalueis not specified.
The value in default and value must be of the same type. Those are the types of variables, and their way of writing.
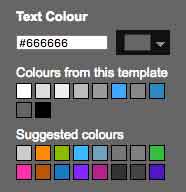
color: should be written in hexadecimal format like#FF2266. You can use this variable as a value of some CSS attributes / properties which need a value of color. You can create group of colors to show up in the theme designer as you see in the following picture.
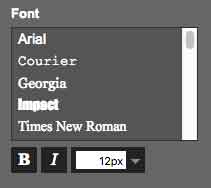
font: the way to specify the font isfont-style font-weight font-size font-family. It is used to give font styling in CSS. It will show up in the theme designer in Blogger as you can see in this image.
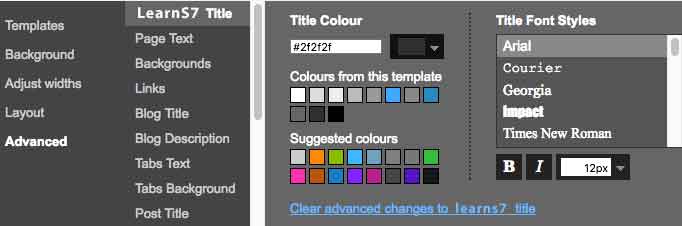
To see theme variables, go to theme then customize and you’ll see the theme designer. Click on advanced and now you can see all groups of variables which you can change their values.
example of group variables in Blogger theme 🔗
<!-- Variable Declaration -->
<head>
<title><data:blog.pageTitle/></title>
    <b:skin>
    <style type='text/css'>
    /** Color and font variable declaration

    <Variable name="title.color" description="Title Color" type="color" default="#000000" value="#2f2f2f"/>

    <Variable name="title.font" description="Title Font Styles" type="font"
        default="normal normal 12px Arial, Tahoma, Helvetica, FreeSans, sans-serif" value="normal normal 12px Arial, Tahoma, Helvetica, FreeSans, sans-serif"/>

    */
    /** CSS styles */
    </style>
    </b:skin>
</head>
or
<head>
<title><data:blog.pageTitle/></title>
    <b:skin><![CDATA[
    /** Color Variable Declaration */
    <Variable name="title.color" description="Title Color" type="color" default="#000000" value="#2f2f2f"/>

    /** Font Variable Declaration */
    <Variable name="title.font" description="Title Font Styles" type="font"
        default="normal normal 12px Arial, Tahoma, Helvetica, FreeSans, sans-serif" value="normal normal 12px Arial, Tahoma, Helvetica, FreeSans, sans-serif"/>
    ]]></b:skin>
</head>
use variable groups in theme code 🔗
It is a good practice in group all related variable in one group. For example, add all variable for styling the page title in one group. Those variables may be the title color, title font and the background color of the title.
Grouping the variables make it easier to customize the blogger theme by normal user (not technical / developer). S/he can customize the theme just by changing the values of variables in the theme designer without seeing the code at all.
To group variables together, we use <group> element. And we use those attributes.
description: short description of the group. It is used to illustrate the variable group in theme designer as you cab see here below.
selector: It specifies a CSS selector to be used in theme designer in Blogger. It is used to highlight the area which will be changed by the values.
example of variable group in blogger theme styling 🔗
<!-- Group Declaration -->
<head>
<title><data:blog.pageTitle/></title>
    <b:skin><![CDATA[
    /**
    * Grouping the variables shown in previous example
    */
    <Group description="Codedodle Title" selector=".header">
        <Variable name="title.color" description="Title Color" type="color" default="#000000" value="#2f2f2f"/>
        <Variable name="title.font" description="Title Font Styles" type="font"
        default="normal normal 12px Arial, Tahoma, Helvetica, FreeSans, sans-serif" value="normal normal 12px Arial, Tahoma, Helvetica, FreeSans, sans-serif"/>
    </Group>
    ]]></b:skin>
</head>
The code above shows how to use variables group. And the above image shows how the variables group appear in the Blogger theme designer.
Using variables in CSS 🔗
To use those variables in CSS use this way of calling the variable. Use $variable_name or $(variable.name) as you can see in the code below.
<!-- Using the variables -->
<head>
<title><data:blog.pageTitle/></title>
    <b:skin><![CDATA[
    /**
    * Grouping the variables shown in previous example
    */
    <Group description="Codedodle Title" selector=".header">
        <Variable name="title.color" description="Title Color" type="color" default="#000000" value="#2f2f2f"/>
        <Variable name="title.font" description="Title Font Styles" type="font"
        default="normal normal 12px Arial, Tahoma, Helvetica, FreeSans, sans-serif" value="normal normal 12px Arial, Tahoma, Helvetica, FreeSans, sans-serif"/>
    </Group>

    /**
    * CSS Style */

    .Header h1 a {
        color: $(title.color);
        font: $(title.font);
        text-align: center;
    }
    ]]></b:skin>
</head>
use template skin in blogger theme 🔗
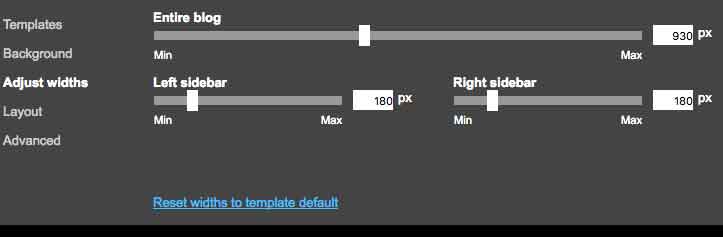
<b:template-skin> is used to contain all width variables of the page layout. So normies can change the layout dimensions easily using Blogger theme designer.
example for b:template-skin in blogger 🔗
<!-- template-skin example code -->
....
<head>
<title><data:blog.pageTitle/></title>
    <b:skin><![CDATA[
    ....
    ]]></b:skin>
    <b:template-skin>
    <b:variable default='960px' name='page.width' type='length' value='960px'/>
    <b:variable default='0' name='main.sidebar.left.width' type='length' value='0px'/>
    <b:variable default='310px' name='main.sidebar.right.width' type='length' value='310px'/>

    body {
        min-width: $(page.width);
    }

    .sidebar-left {
        min-width: $(main.sidebar.left.width);
    }

    .sidebar-right {
        min-width: $(main.sidebar.right.width);
    }
    </b:template-skin>
</head>
other types of variables 🔗
There are other types of variables which Blogger supports. Those variables are used in other areas in Blogger theme code. See this code as an example of that.
<!-- other variable types -->
<head>
<title><data:blog.pageTitle/></title>
    <b:skin><style type="text/css">
    /** Length Variable */
    <Variable name="content.padding"
        description="Content Padding"
        type="length"
        default="10px" min="0" max="100px"
        value="10px"/>

    /** URL Variable */
    <Variable name="body.background.gradient"
        description="Body Gradient Cap"
        type="url"
        default="url(https://domain.com/path/to/gradient.png)"
        value="url(https://domain.com/path/to/gradient.png)"/>

    /** Background Variable */
    <Variable name="blog.background"
        color="$(content.background.color)"
        description="Background of blog paging area"
        type="background"
        default="transparent none no-repeat scroll top center"
        value="transparent none no-repeat scroll top center"/>

    /** String Variable */
    <Variable name="page.width"
        description="Page Width"
        type="string"
        default="auto"
        value="auto"/>
    </style>
    ]]></b:skin>
</head>
The above code illustrated variables of type length, url, background and string.
We finished talking about how to add CSS in Blogger theme, how to use blogger variables in styling, how to make it easier to customize themes by variables groups in theme designer without coding.
I hope you like this long tutorial. You can read more about programming languages and frameworks here on AbanoubHanna.com . If you recommend this tutorial? share it on social media.