Extract Images From a Video – Android, Windows, Mac OS and Linux
Extract images from a video on Android 🔗
You can use the video player in your smartphone. While watching a video, tap to pause the video on the scene frame you want to capture, then click on control tools, then choose screenshot. That’s how you can get an image from a video on Android without any external apps or third-party apps.
But if you need to extract many images from a video, use this app to extract one image for each second of the video. That’s how you get all the video content in an image album. You can extract 5 image from each second, or whatever images each 1 second or 1 minute.
Extract images from a video on Windows OS 🔗
While you are watching a video on your desktop/laptop computer, make the video fill the screen, then press the Prt Scr or Prt Sc button (stands for Print Screen) on keyboard. Then open Paint program or Photoshop, to use the screenshot of the scene frame.
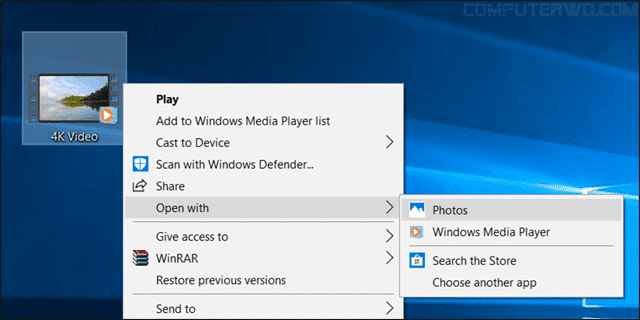
If you need many images from the video, open the video in the program called “photos” by Microsoft (see the picture below).
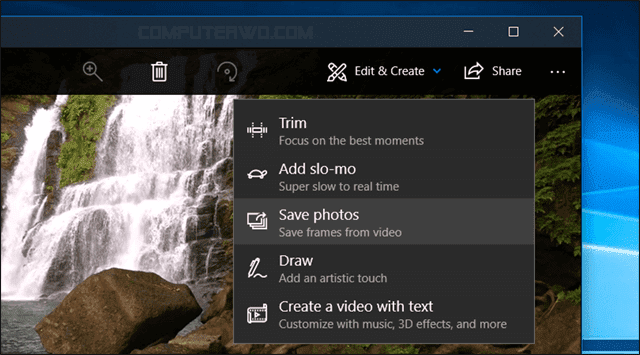
After that, click on Edit & Create then Save photos.
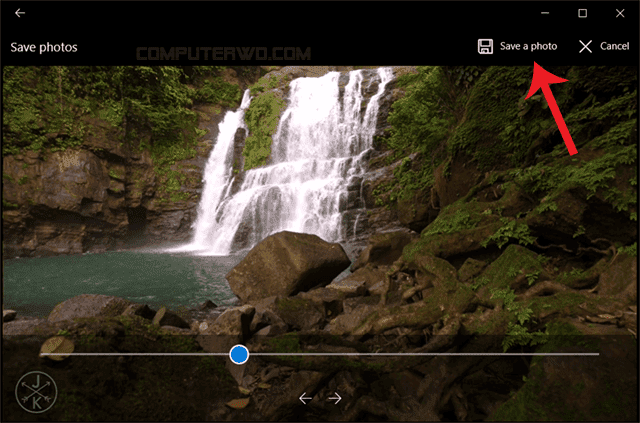
After that, watch the video, when you reach the scene frame you wanna capture, click on save a photo button.
If you want to use the famous VLC media player, go to Linux section below.
Extract images from a video on Linux 🔗
If you like using Terminal / Console / CLI, use this command to extract images from a video.
ffmpeg -i inputfile.mp4 -r 1 -f image2 image-%03d.jpg
This command uses the famous program for media manipulation called ffmpeg.
Let’s see the meaning of each part of the command.
This part -i inputfile.mp4 means that the video we are extracting from this inputfile.mp4.
This part -r 1 means that we wanna extract an image from each second of the video.
And this part image-%03d.jpg means that we wanna name the extracted images from image-001.jpg to image-999.jpg. This %03d means 3 placeholders of decimal numbers while keeping all places all the time (20 is written 020).
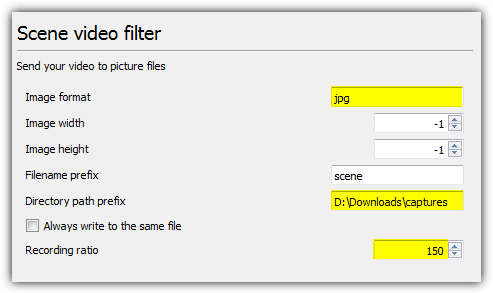
But if you have VLC media player installed, open Program’s Preferences then click show all settings then show all items of the heading video, then choose filters, then click scene filter.
Choose the image format (extension) such as jpg, bmp or png.

Then choose the directory path prefix where the extracted images will be saved in.
After that, specify the recording ratio. This number means that you want to capture one image from each X number of image (also known as video frame). If you choose 100, you mean I want one image from each 100 frames in the whole video.
Extract images from a video on Mac OS 🔗
screenshot method 🔗
Watch the video in full screen, then take a screenshot of the scene frame you need.
VLC Media Player 🔗
You can use the same method from Linux section above, which is using VLC.
FFmpeg in Terminal 🔗
You can use ffmpeg in Terminal as you can see in the Linux section above.
I hope this post helps you. If you know a person who can benefit from this information, send them a link of this post. If you want to get notified about new posts, follow me on YouTube , Twitter (x) , LinkedIn , and GitHub .


